Personnel management
The information collected on the form can be managed in the person group view.
When people have registered using the form, or have been added by the producer, the system creates a list of people, row by row, which appears in the person group view. You can also manually add people from the person group home page, using the Add new and Import options.

All The button lets you see at a glance how many people are in the group. If you sort the group by tags, products, language or status, the number will change depending on your selection.
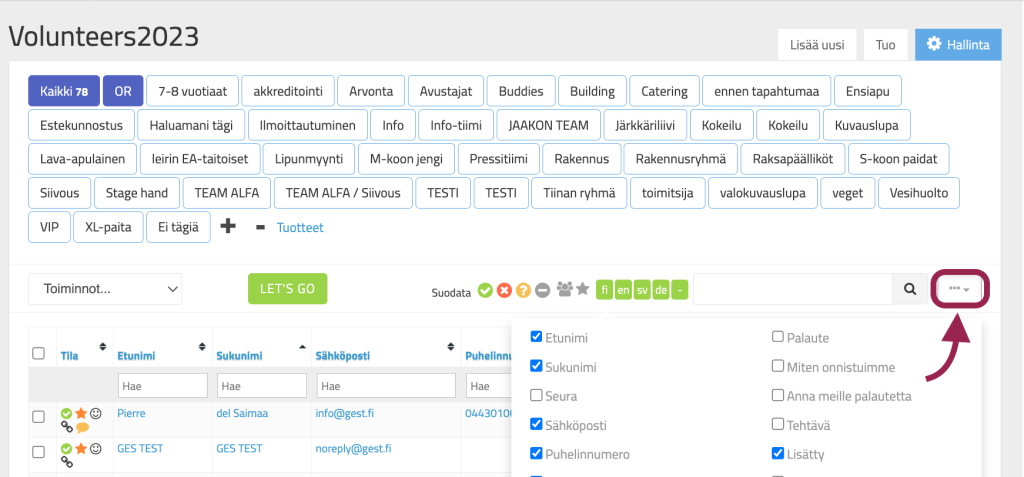
From the right side From the three dots menu, next to the search field, you can choose which form fields are displayed on the home page at any given time. For example, if you want to view the responses of a group of people to specific form questions, you can check them in the menu.
The options are only visible in your account.
Managing and editing personal information
By clicking on the person's name You can view and edit the information in more detail. You can see all the information that the person has completed on the form. If necessary, you can make changes to the information, assign products, add tags, or write notes related to the person.
Notes and products are displayed both on the person's card and in the person's check-in view. When the person is checked in through check-in, the information is easy to find.

Functions menu
On the left side of the person group view is the Actions drop-down menu. This menu allows you to edit people's statuses, send emails, text messages, and files, add or remove tags, and assign products, among other things. The Actions menu is great for mass actions, especially when you want to easily manage dozens, hundreds, or even thousands of people at once.

When you want to perform an action, first select the check mark in the left column all those people whose data you want to process or for whom you want to perform a certain action. If you want to perform the same action for the entire group of people, select the top check box (Status).

Then select from the drop-down menu your desired function from the Let's Go menu and then, press Let's go button.


Status
From the left column of the person group view Status you can see the status of the people. Orange color represents a person whose data processing is awaiting approval. Green symbolizes the accepted, red abandoned and gray people who have canceled. In the upper right corner, you can filter people by status. You can also filter out duplicate rows from view.
You can make changes to people's statuses using the Actions menu.

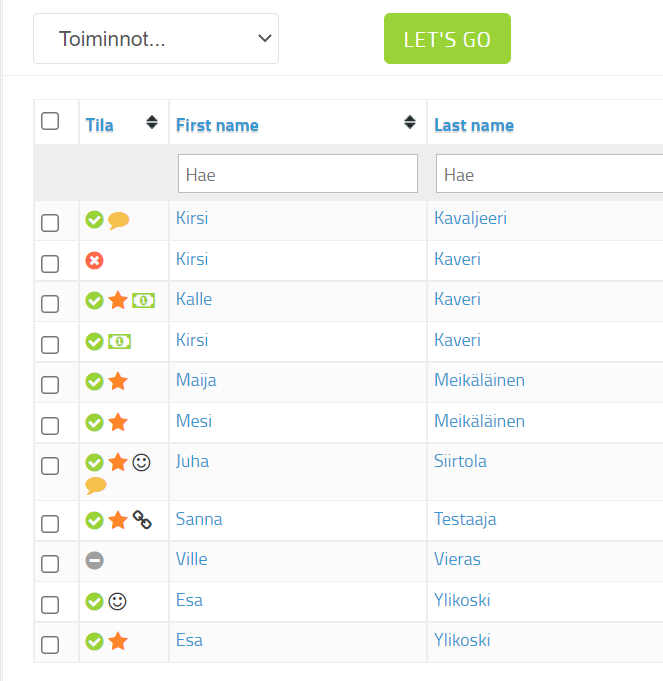
In addition to the status, the Status column can contain different symbols that reflect different functions:
A bill: The person has purchased products. Green indicates a payment has been made. An orange note indicates that the person has selected the invoice. If the note is black, the payment has been rejected and the payment transaction should be checked in the Paytrail panel. A blue note means that the product was free, i.e. no payment was made OR the product was paid for on their behalf (the name of the contact person, i.e. the payer, is recorded in the person's information).
Speech bubble: Notes have been added to the person's information.
Smiley face: The person has accepted their shifts.
Star: The person has made a group registration/is the contact person for the group or organization.
Link: The person has been added to one or more collections.
Tags
People can be divided into different categories using tags. Tags (e.g. identifier, label, keyword) can be created for, for example, event volunteer tasks, diets, dates, work stations, guest accommodations, or partner registration.
The tag can be anything that makes it easier for you to define the people you want to manage, and the smaller groups that are segmented from them. You can create exactly the kind of tags you need for each group of people. Please note that the tags you create will be visible to everyone who has access to that form. You must create your own tags for each form, and they will not be copied.
You can create a new tag by clicking + characters. Enter a name for the tag and press Save. The tag will appear at the top of the person group view. A person can be assigned to a tag either through the Actions menu or by clicking to open the person's details and adding via the tag function.

Utilizing the tag
When you want to view the people attached to a certain tag, select the tag from the top by clicking on it.
- The view filters all the people who are connected under that tag.
- A person can have multiple tags at the same time.
People can also be filtered by tags Or/And/Not -button: This button provides Yes/Or/No options. Suitable for use when you want to view two or more tags and the people associated with them.
First, click on all the tags you want to view. Then click the Or/And/Not button as many times as you want to get the action you want:
- When the button says AND, the button filters to show people who are associated with all selected tags.
- When the button says OR, the button filters out people who belong to one of the tags you selected.
- When the button has NOT, the button filters out all people who do not have one or all of the tags you selected.
NOT is good, for example, when you want to find out who doesn't have a tag assigned to them.
Communication for a group of people
You can send emails and text messages to an entire group of people via the Actions menu. GEST makes it easy to communicate with different groups of people throughout the process, from pre-production to the event and beyond. You can also send customer and member letters.
Sending an email
Recipients can also be filtered by tags, products, and statuses. For example, if certain products have been purchased or spaces reserved using forms, you can communicate even closer to the event with instructions regarding products and reservations.
The Actions menu has several options for sending an email: you can either send just the email, or at the same time make changes to the recipients' status, e.g.
- Accept + email
- Reject + email –> while you are notifying that the person was not selected, you can change their status.
- Cancel + email
Sending an email is discussed in more detail in section External communication.


Sending a text message
Select the recipients of the text message with the ticks and then select Send text message from the Actions menu.
All phone numbers are displayed in the Recipients field. At this stage, you can still add phone numbers. Separate the numbers with a comma.
The length of a single text message is 160 characters. If the number of characters in the message exceeds this, the sender pays for two, or if the number of characters exceeds 320, for three messages per recipient. Files or links cannot be attached to a text message.
Please note that sending text messages requires activating a text message package. Messages are billed based on usage.

Adding products for people
Various products can be assigned to individuals in a group of people, such as passes, meal or admission tickets, and gift bags or work shirts. Creating products is discussed separately in Products.
Products can be assigned to a person either through the Actions menu or by adding them to the person's information under Products and Add.

Select the desired product and the number of products from the drop-down menu. Remember to press Add between adding each product. You can add multiple products at the same time. Finally, press Save.
All added products appear both in the person's status and when checking them in, so they can be handed over to the right people.

 English
  Finnish