Work shifts
With GEST's shift tool, you can plan and manage shifts for employees or volunteers, or create training or practice schedules for groups, for example. Shifts for multiple teams can be created under one production platform/collection. For example, it is possible to plan all volunteer shifts for a single event within the same collection, creating a separate row for each point, i.e. a separate schedule.
Work shifts can be assigned either 1. internally or 2. by letting the person choose their own shifts.
- Shifts can be added to employees by the producer, who then determines each person's shifts and submits the shifts for approval.
- Work shifts can be sent to the approved person for self-selection via a post-fill. Instructions for this can be found at the end of the page.
In both cases, shifts are created first, only then are people assigned to the shift.
Creating a new shift base
You can also watch a video on creating shifts here. The same video also shows how the producer adds people to shifts and sends them for approval.
A new shift collection is created from the end of the collection row, + button.
- Name the collection
- Select a base from the drop-down menu Schedule

You can then edit the fields in the form. The fields cannot be completed from outside GEST, the producer adds the necessary information. This information is supplemented with information about each workstation/day, etc.

A new workstation or shift template is created in the collection view by clicking Add a new one.

Record workstation/shift information
Write to the workstation name, such as an Info Point. If you wish, you can define a workstation start and end times, i.e. what day Info shifts start and when they end. You can also write more information, such as the contact information of the team manager. If you are giving shifts to be picked externally, also change status approved.
Then click Save. The workstation's shift schedule appears in the collection view.

Creating shifts
By clicking on the name of the workstation you created, you will access the calendar view.
This can be viewed, for example, by month, week or day. The times are shown in the left column.

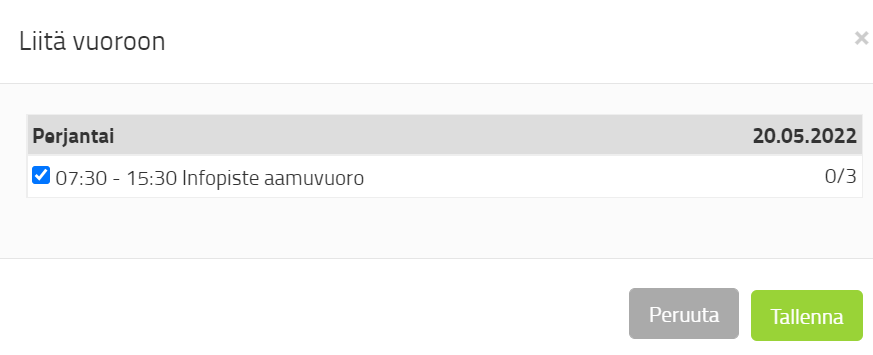
A new shift is created by clicking on the desired day and time in the calendar template. You can then enter more detailed information about the shift (picture below).
- You can name according to the shift assignment, for example, Info Point morning shift
- After that, you can set the shift date and duration and choose a tag color
- Set a time minimum and maximum number of people, that are needed to fill the shift.
- This limits workers to only externally filled shifts. The producer can add people to a shift beyond capacity.
- Finally, you can add to the queue alternative description, where you can enter additional information about the shift.

Once you have completed the required information, press Save. The shift will appear in the calendar view. The first number in the right corner of the shift indicates how many people are assigned to the shift. The second number indicates the minimum number and the third the maximum number of people needed to fill the shift.

1. The producer adds people to shifts
People are assigned to shifts on a shift basis. via the drop-down menu at the bottom.
First, select a group of people, whose people you want to assign to shifts. You can filter the view using tags, for example. Tags speed up the creation of shifts, as they allow you to quickly find people who have been tentatively assigned to a specific task.

Select your desired cast and then click Let's go button. Select your desired turn or shifts you want to assign people to. Finally, press Save. The connected people appear in the shift details.
People assigned to shifts are also visible in the right-hand column. Castin the column.
ShiftsThe circle below the title represents the individual shift the person is assigned to. There are as many circles after the name as the number of shifts the person has at the workstation during the event.
- White circle: A shift that the person has not yet been notified about. The person has not been sent shifts by email.
- Orange circle: A shift for which a message has been sent to the person, but the shift has not yet been accepted.
- If shifts can also be booked externally, the producer must internally set the people they have added to the Waiting status so that the capacity in the shift is used up. More on this below, in the instructions for externally booked shifts.
- Green circle: The turn has been accepted.
- Red circle: The turn has been abandoned.
- Gray circle: The person has canceled their participation.
- Thumbs up: The person has been sent shifts and has accepted the shifts.
- Thumbs down: The person has been sent shifts and has declined them.
Shifts also appear in the person's details in the person group view.


By clicking on a person's name, you will open a view that summarizes all of the person's shifts in that calendar. All shifts On the tab, you can also see shifts in other shift collections or workstations.

Accepting shifts
People can accept their shift via an email link.
To approve shifts, you must create your own email template with a placeholder attached. %recipient.shiftplan% i.e. a link to shifts. Creating message templates is discussed separately in section External communication. The link in the email directs the person to review the personal shifts created for them and to accept or reject them.

Tip! If you wish, you can add a cover text and banner when approving shifts. You can edit the text from the Workstation row, via the Settings function. Create a visual schedule with relevant links and instructions for the person coming to work. Here you can also specify whether the person can accept or reject shifts individually.

The smiley face in a person's status indicates that a confirmation message has been sent to the person.

Once all the necessary information has been completed, the completed shift template may look like this:

2. Externally selected work shifts
If the event or workstation is one where an external person (volunteer, club member, etc.) is allowed to choose their own shifts, the functions will differ slightly from internally added shifts.
- Create shifts according to the instructions above. You can see above how to create a shift. Your no need to create separate shifts and work points for shifts added by the producer or by volunteers/staff members themselves.
- If only one group is allowed to choose their own shifts, it is a good idea to move them to their own group of people (create a new person form and copy/move the people's information there), because the right to register for a specific shift is granted to these people via the post-registration (follow-up) function.
- You can read more about post-replenishment here. through here.
- A link to the selectable shifts will be sent by email with a post-fill placeholder. 1TP3Recipient.filllink%. Creating message templates is discussed separately in section External communication.
Specify which shift collections are externally selectable
- Next, select which shift collections are externally selectable. The collections are selected from the person group's Replenishment page.
- If you want to make shifts available for external selection, go to Administration -> Publishing Settings -> Post-fill for the desired group of people (e.g. volunteers).
- In the post-replenishment you can also specify, What personal information in the form the recipient can see and edit.
Replenishment functionalities (image below)
- In this section, you specify what information about yourself the person can see via the post-complete link.
- In this section, you specify which information the person can edit via the post-complete link.
- You can edit two different functions
3.1 You give permission to people to delete their own shifts.
3.2. You choose which shift collections are externally selectable, i.e. which workstations the person can choose.
You can select all active shift collections. The approved workstations within them are visible. If you do not want some of the event's workstations to be visible, leave them in the wait state. Instructions for this are below.
Note If you allow the deletion of shifts, a person can delete a booked shift until the shift is approved either by the person themselves via the approval link or by the producer in GEST. This allows for the correction of typing errors, but does not allow for continuous editing of shifts. PThe deletion right applies to all shift collections for which you have allowed it. The right cannot be limited to individual shift collections. You can also disable the deletion right completely if you wish.

Determine which workstation shifts are available for selection from outside
In the previous section, you defined which collections are visible and therefore selectable. Now you define which workstations within these collections are selectable.
The producer can add people from within to all workstations and shifts, but only those shifts that are accepted (Accepted), are selectable from outside. The workstation must therefore be approved (status green).

You can create work stations by leaving them in the 'Waiting' status, but when you want them to be available for selection, change their status to 'Accepted'. You can access the editing by clicking on the pencil next to the workstation name. This way you can only make some of the shifts available for external selection.
Maximum number of people per shift
To avoid having too many employees on a shift, set a maximum number for each workstation. Go through all shifts for each workstation according to the instructions below.
The maximum number of people is determined work shift settings Maximum number of people -. Click on the shift and go to the Shift page. Enter the number of people in the space provided. The producer can assign more people to the shift than the maximum number indicated. However, the maximum number is externally limited and does not allow adding people to the shift if the maximum is full.
Minimum number of people The item is a reminder to the producer about the minimum number of people to be on the shift. The function does not tell you that more people should be added to the shift.
Maximum number of people determines the maximum number of people in a shift, and closes the shift to registrations from outside if the number is reached.
Note: A maximum number of people must always be specified for externally selected shifts. If no number is set, the shift will appear full to external users and they will not be able to sign up for it. This protects against the situation where an infinite number of people cannot accidentally register for a shift.


Once you have set up,
- Which workstations are available for selection from outside (approved)
- What is the maximum number of individual shifts at a workstation?
You can send the shifts to the people you want to choose by email. Use a post-fill placeholder to select shifts 1TP3Recipient.filllink%. Creating message templates is discussed separately in section External communication.
Sending work shifts for external selection
Shifts are sent for selection via email with a post-completion placeholder added 1TP3Recipient.filllink%. Creating message templates is discussed separately in section External communication.

- Once you have created a message template, you can send the message to the people you want.
- The link generates a personal link for each recipient, through which they can register.
- The message is sent normally via the Send Email function, from the Actions drop-down menu.
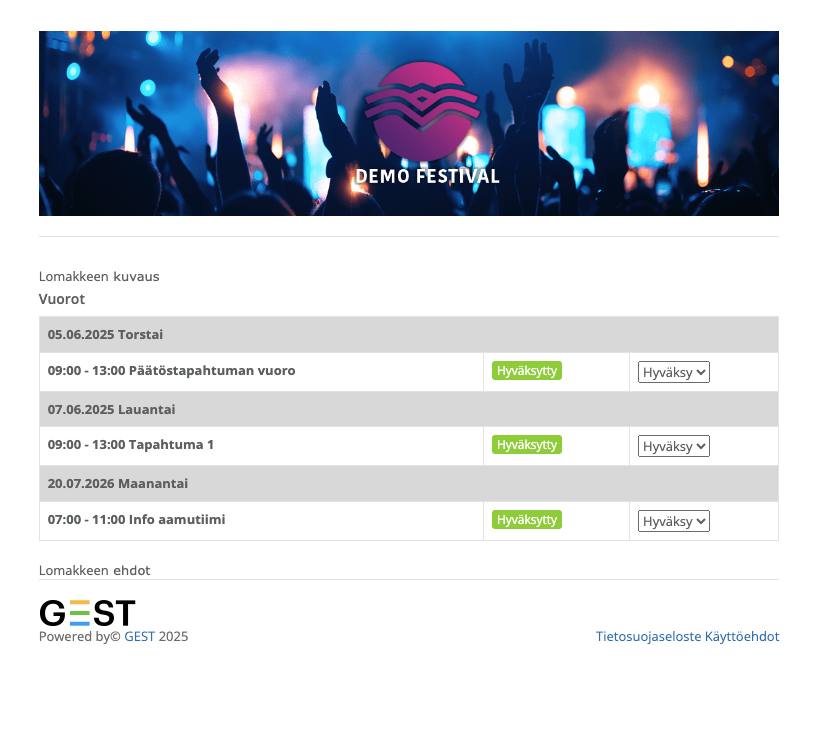
Work shift selection via link
After opening the link they received, the person can choose shifts. The following are available:
- collections that have selected from the Replenishment page and
- the shifts you have accepted from these collections.
In the first drop-down menu (Select new) all are displayed work shift collections, which the producer has specified through Post-fill (follow-up function). We recommend you name the collection after the event and year in question, e.g. GEST Fest 2025. This will help the employee find the right event.
In the example view, the volunteer has already chosen shifts, some of which have been approved.

In the adjacent drop-down menu are the workstations for the selected collection/event. They only appear when the desired collection is selected.
Once a workstation is selected, the shifts for the selected workstation will be displayed. You can hide a workstation by leaving it in the Waiting state. From the view you can see, how many free seats are available in the queue. Capacity is used up when a queue is selected and saved.

The platform does not allow a person to select the same shift twice. However, it does not block other shifts at the same time at the same or different workstations.
The person's view displays all of the person's shifts as long as the producer does not delete, archive, or put the workstations in the Pending status.

Validity of the refill link
The post-replenishment link is valid and the person can return to it to select work shifts for events as long as they are visible to them (i.e. the collection is selected and the workstation is in the approved state).
The link also serves as a good work shift calendar and a compilation of all the collections he has chosen.
When you want a person to no longer be able to select new shifts, put all workstations in the Waiting state.

A workstation with the status "Waiting" is no longer selectable. At the same time, if a person's own workstation has been put in the "Waiting" status, the workstation and its shifts will also be removed from the view via the link. For this reason, sending shift approval is a good way to ensure that the person always has their own shifts available to check somewhere. It is a good idea to do this even if you have approved the shifts on their behalf.

Checklist for externally selected shifts
- When a person signs up for a shift externally, via a Post-replenishment link sent by email, they will appear for the shift with the status "Waiting".
- Status consumes the workstation's capacity and at the same time the producer can see which person has joined the shift as a new person/has not yet been confirmed.
- Please note that the Waiting status is also given to individuals when shifts have been sent to them for approval via internal addition.
- Shifts can be sent for further approval via email with the %recipient.shiftplan% placeholder added. Creating message templates is discussed separately in section External communication.
- The producer can also, if they wish, approve the shift in the shift view.
Management of people added by the producer and those who register externally in the same shift
You can add people to shifts at the same time you make the shift available for external selection. To ensure that the maximum number is not exceeded and that capacity is used correctly with each addition you make, you must manually edit the status of the person you add.
Do it like this:
- Add the desired person(s) to the queue as normal. Remember to check the maximum amount you have created.
- Note: by adding internally you can exceed the maximum amount.

- Then click on the turn, to which you added people.
- Go Castto the subpage and change of persons assigned to the shift status To wait mode manually from the drop-down menu. Click Save.
- The status of the connected people changes, and this update consumes capacity from externally selected shifts.
- The person's status will be moved to Waiting, as they will still be sent work shifts for confirmation.
- If you don't need to send a separate "Confirm your shift" message to the person, their shift can be immediately set as accepted.

Note: Be careful. The Pending status also indicates that the shifts have been sent for approval. So remember who you have sent the shifts to for approval and who has not received a confirmation.

Printing shifts
It is possible to print out a list of work shifts, showing who's working and additional information on the shift.
- If you want the lists in PDF format, press Print.
- If you want the shifts as an editable CSV table, press CSV. You can also download the table to your computer and edit the list during the event in a spreadsheet program.

In the print view (PDF), you can see the dates, times and people assigned to the shifts. You can also add phone numbers of people working on the shift to the PDF view. However, these can be hidden in the settings.
The CSV table contains the person's basic information, shift information, and duration of the person's shift in hours and minutes. If you want a customized version, i.e. you need information that is relevant to you to automatically appear in the table, please contact us at info@gest.fi.
Possibility to accept shifts individually
You can give an employee the right to approve submitted/selected shifts individually.
Usually, for example, a volunteer's shifts, which are multiple, can be accepted either all at once or none at all. This way, no one gets to choose the so-called cherry on top of the cake. However, if you want to let people choose which assigned shifts they want/can accept, do it as follows:
Go to the workstation Settings and give permission accept shifts individually. Always remember to save after making changes.

