Personnel groups
The GEST system is based on manageable groups of people, from whom information is collected using customized registration forms. This personal data form forms the basis of each group.
The form creates a structure for collecting information from different groups of people and for managing people. The form can be published to be filled out outside the system, or the producer can fill out the form with the person's information from the home page, from their own view. If the producer wants to import a larger number of people, this can be done using the Import function, which can be found on the home page of the person group.
Forms are versatile and can be customized to meet different needs and can be used for, among other things, recruiting employees or volunteers, registering invited guests, accrediting media, or even collecting requests for quotations. Personnel forms can also be used to create lists of supplies or technology.
The information you collect makes it easier to structure, group, and generally manage people.
Creating a person group / form
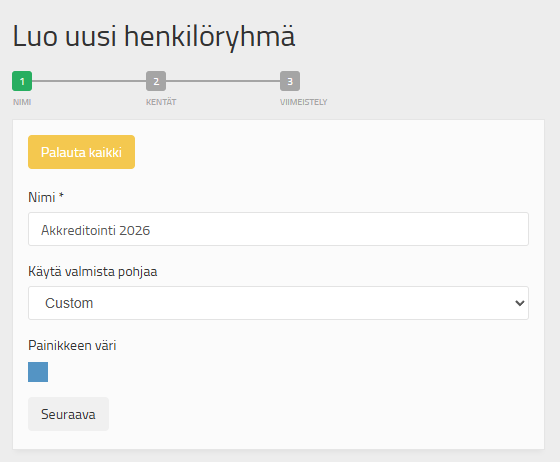
To create a new person group, start by clicking the + sign at the end of the person group row.
Name the form after the group of people whose information you want to collect with the form, such as Volunteers or Invited Guests. We recommend adding the year after the name, which will make it easier to find and distinguish the form on both the home page and the archive. You can also choose your own identification color for the group. After publication, the group of people you created will appear in the top bar of the home page, so the identification color will help you find the group quickly in the future.
Select Custom as the base and press Next.
Editing and customizing the form
After you have named the personnel group and chosen an identification color for it, you can next edit the form itself.
The form comes with 5 Dedicated fields (gray background). Dedicated fields are intended only for collecting the data entered in them.
- First name: collect only the first name
- Last name: collect only the last name
- Organization - Organization: collect only organization
- E-mail – E-mail: collect only e-mail
- Phone - Phone number: collect only the phone number
Once the information is entered in these fields, you can find the person correctly through Check-in, send emails and text messages, etc. If separate fields are created for the same information, automations may not work correctly. For example, we do not recommend using one field to collect the entire name, but rather that the first and last names are recorded in their own fields. Do not use dedicated fields to collect information other than what they are intended for.
If you don't need one of these five dedicated fields, you can hide the field by selecting hide.
Creating new fields
At the top of the field menu on the left, there are two options: Add field and Edit field.
To add a new field to the form, press Add a fieldfunction. Adding fields to a form is done by grabbing the desired new field with the mouse and dragging it onto the form. The added fields always appear at the end of the form, from where you can move them to the desired location.
Once the field has been moved to the form, it becomes active (green) and automatically goes Edit the fieldmode. When you want to edit the information in the fields, click the field you want to edit to make it active.
You can remove unnecessary fields with a red cross.

Form fields
In the left sidebar, you can find various fields that are suitable for numerous purposes:
- Text field: A text field suitable for open-ended questions. The maximum number of characters for the answer is 255.
- Text area: A text field that should be used especially for open questions that require longer answers. The maximum number of characters is 65534 characters.
- Email address: This field is used to collect email addresses. This field should be used to collect email addresses so that emails sent through the system are sent to individuals.
- Telephone number: This field collects phone numbers. You can select the country code from the drop-down menu. This field should be used to collect phone numbers so that text messages sent through the system can be sent.
- Check box: A checkbox can be used, for example, at the end of a form to ensure that a person has checked their information. You can give the checkbox a value that the checkmark in the field indicates (yes or no, yes is the default). The checkbox can also be used, for example, to collect diets and allergies. The program counts each selection, so you can see how many people have chosen, for example, a vegan diet.
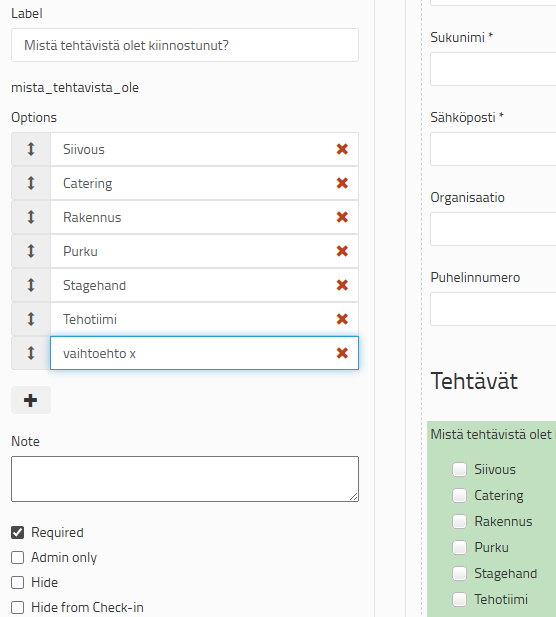
- Drop down menu: Several answer options can be entered in the drop-down menu, from which the respondent chooses one option.
- Multiple choice box: The multiple-choice box allows you to select several answer options at once.
- File: In this field, the person in the form can upload a file. Supported file formats are .pdf, .jpg, .tiff and .png. The maximum file size is 50 Mb.
- Date: A calendar view opens from this field, from which you can select a date.
- Time: A drop-down menu opens from this field, from which you can select the time with an accuracy of five minutes.
- Number: In the Number field, you can request to add numerical information such as number of people, number of visitors, prices, etc.
- Subheadings With subheadings, the structure of the form can be structured into an easier-to-read format. Subheadings should be used especially when the form has several sections. You can write a title and a short description.
You can edit the field's titles, instructions, and settings by clicking on the field, which will make it active. You will notice this when the field turns green.
Label-enter the field title. NOTE! The title must be at least 3 characters long. Otherwise, the program will not save it and will not allow you to proceed.
Options- you can enter answer options (if the field is a multiple choice or drop-down menu).
Notes, i.e., 'Note': Here you can write notes that will appear on the form. For example, you can record instructions for the person filling the form.
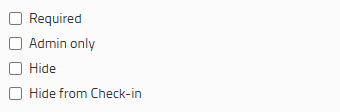
Required, Admin only, Hide and Hide from Check-in
You can specify whether to make filling the field required, or is it visible it only them for those with admin credentials, who have access to the form (admin only)You can also hide fields from all users (hide)The Hide function is suitable, for example, for hiding confidential information from everyone afterwards.
The Hide from check-in option hides information from Gate ID holders. This means you can hide form fields that you don't want to give access to to people outside the production. Those with a gate ID are usually help desks that operate in the akre or check-in, and the information to be hidden can be, for example, artists' phone numbers.
When you have created the form to your liking, press on 'Create'. Remember that you can edit the form at any time, even after publishing it. The form can be found in the personnel group management, on the 'Form fields' tab.
Note! If you delete fields after publishing the form, the information from them will be lost from the system. So if you want to delete a field, it's better to hide it (Hide) so that the information is not lost.
Once you have created the form, Save. Also remember to save whenever you have made changes to the completed form.